Fanvil X3S / X3SP — step-by-step setup for our PBX
The Fanvil X3S is an inexpensive desk IP phone with a colour screen and two lines. It usually sits on a front desk, at a bar or in a back office. This page is a detailed guide for one model, written for someone setting up an IP phone for the first time. Go through the steps from top to bottom: in about 15 minutes the phone will be taking calls from your PBX.
The same guide works for the X3S's relatives — the X3SP (powered over the network cable), X3G, X3SG and X3S Pro / X3SP Pro. Where they differ, the text says so. Other Fanvil phones (X1S, X4U–X7, V6x, the H hotel phones) are covered on the shared page “Fanvil X / V / H”, and what is common to all brands is in the overview “Setting up SIP phones”.
Three X3S passwords — do not mix them up#
The X3S has three different passwords. This is the most common reason for “I type the password and it doesn't work”: people type one password where another one is expected.
| What | Factory value | Where you need it |
|---|---|---|
| Phone web interface login (in a browser) | user admin, password admin |
Step 2 — the browser login window |
| PIN of the phone's own menu (“Advanced Settings”, keypad unlock) | 123 |
When the phone asks for a password on its screen |
| SIP account (extension) password | there is no factory one — the Cenaly admin panel issues it | Step 3 — the Authentication Password field |
The SIP account password is not admin and not 123. It is the long password from the “Extension credentials” window in the admin panel.
What you will need#
- The extension credentials from the admin panel. Open Admin panel → Telephony → “Staff & groups” tab. When you create an operator, the “Extension credentials” window opens right away. If you have already closed it, click “Reset password” next to the operator — the window opens again with a new password. It shows six values: SIP server, extension number, user name, password, port and transport. Click “Copy all settings” and save the text in a note on your computer. The password is shown once: you cannot view it later, only issue a new one. More — “Credentials”.
- A router or switch with a free port and a network cable (there is one in the phone's box).
- Power. The plain X3S cannot be powered over the network: it needs its 5 V power adapter (included in the box). The X3SP, X3G, X3SG and X3S Pro take power from a PoE switch (802.3af); without one, use a power adapter sold separately.
- A computer with a browser (Chrome, Edge, Firefox) on the same network as the phone. Guest Wi-Fi will not do: it usually stops devices from seeing each other.
Step 0. Connect the phone#
On the back, the X3S has two identical network sockets, and they are easy to mix up:
| Socket | Icon | What goes in |
|---|---|---|
| Network | three small squares joined by lines | The cable from your router or switch. Required |
| PC | a monitor | The cable to the computer at this desk. Optional: the phone simply passes the network through, so the computer does not need its own wall socket |
| DC 5V | round jack | The power adapter (on the X3SP — only if there is no PoE) |
| Handset and headset | handset and headphone icons | The coiled handset cord goes into the handset socket, not the headset one |
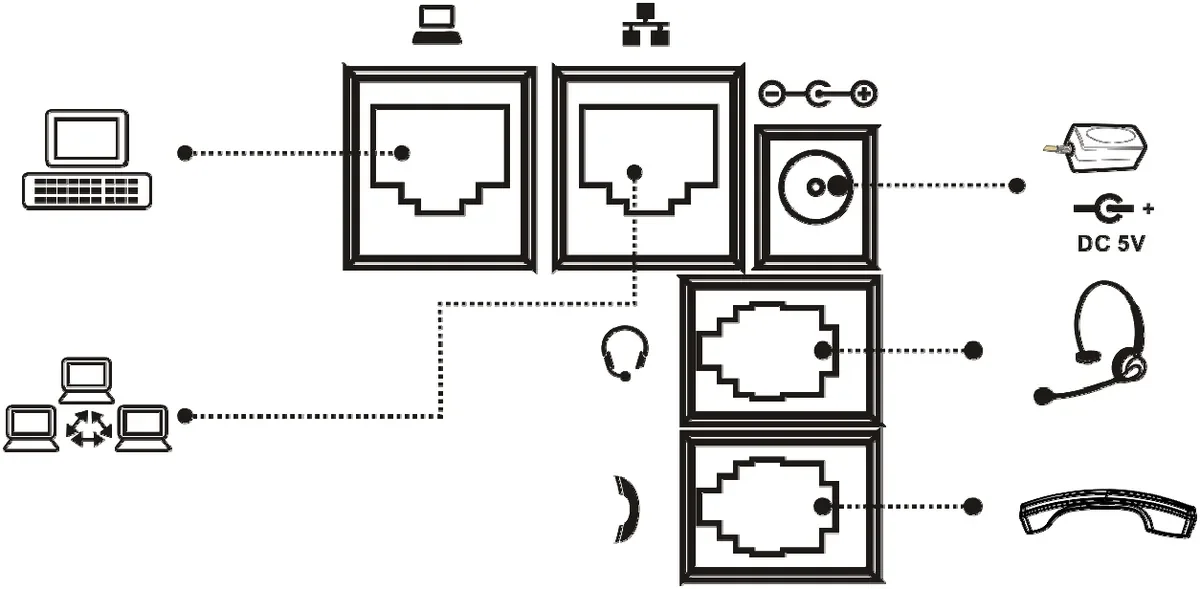 Screenshot: Fanvil X3S User Manual (the cover says X3G), document version 2.0, p. 13 — “Connecting to the Device”.
The usual wiring looks like this:
Internet → Router / switch ──cable──> [Network] Fanvil X3S [PC] ──cable──> computer
                                                  │
                                       power adapter (or PoE)
Switch the phone on and wait about a minute for it to boot. Out of the box the X3S gets its IP address from the router by itself (DHCP mode), so there is nothing to configure at this point.
Step 1. Find the phone's IP address#
The IP address is the phone's “house number” on your network. You need it to open the phone's settings from a computer.
The fastest way: in standby, press the down arrow ↓ on the round navigation key. The Status screen opens right away:
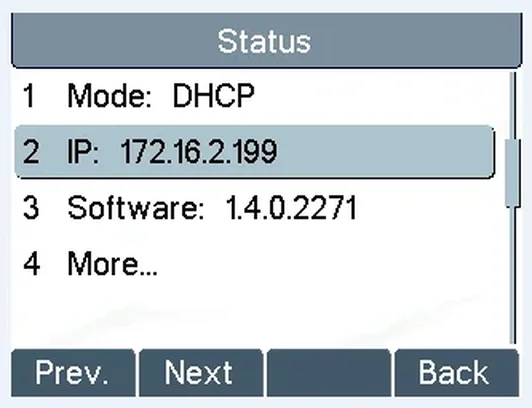 Screenshot: Fanvil X3S User Manual, p. 17 — “Check the Device’s IP Address”.
You need the IP line. In the picture it is 172.16.2.199; yours will be different, most often something like 192.168.1.57 or 192.168.0.105. Write it down.
You can open the same screen through the menu: Menu → Status. On the X3SG and X3S Pro the Status section has tabs: open the Network tab, the address is in the IPv4 line.
If it says Negotiating… instead of an address, the phone did not get an address from the router:
- Check that the cable from the router is in the Network socket, not PC.
- Check that address assignment (DHCP) is on in the router — it is on by default in home and office routers.
- Find the phone in the router's list of connected devices. It may show up as
Fanvil,X3Sor with no name at all. The MAC address is more reliable: it is on the sticker under the phone and on the Status → More… screen.
Want the phone's address to stay the same?
Out of the box the address may change after the router restarts. The phone does not care: it finds our PBX by itself, and the PBX does not need to know its address. A fixed address only helps if you often open the web interface.
The best way is a reservation on the router (DHCP Reservation, “bind IP to MAC”). In the router settings you enter the phone's MAC address and the address you want, e.g. 192.168.1.50. The phone stays in factory DHCP mode but always gets the same address, and you cannot get the mask, gateway or DNS wrong.
A static address on the phone itself — only if you know your network's parameters: Menu → Settings → Advanced Settings (PIN 123) → Network → Network Settings → Static IP. You fill in the address, mask, gateway and DNS, e.g. 192.168.1.50 / 255.255.255.0 / 192.168.1.1 / 192.168.1.1. One mistake in any of the four fields and the phone drops off the network — then only a reset helps.
Step 2. Log in to the web interface#
Setting the phone up from a computer is easier than with the phone's buttons: you can paste the long user name and password from the clipboard.
- Open a browser on a computer on the same network.
- In the address bar (not the search box!) type
http://followed by the phone's IP address, e.g.http://192.168.1.57, and press Enter. - A login window appears with User, Password and Language fields:
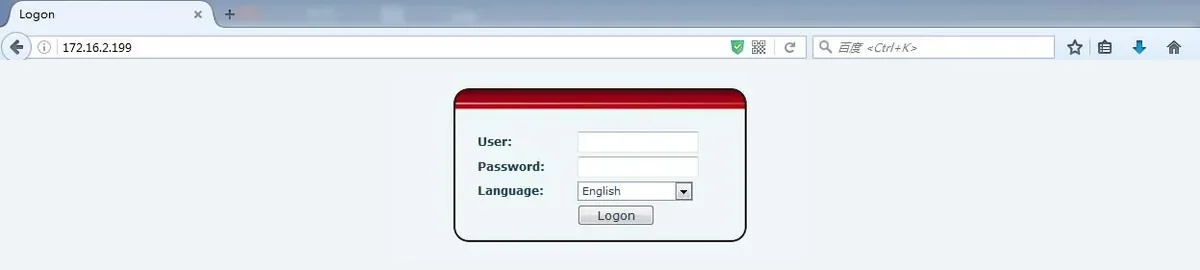 Screenshot: Fanvil X3S User Manual, p. 18 — “Web Portal Login Page”.
| Field | What to enter |
|---|---|
| User | admin |
| Password | admin |
| Language | leave English: menu names in this guide are given in English |
The factory web login and password are admin / admin (lower case). They are also printed on the sticker under the phone.
The page does not open?
- The computer and the phone must be on the same network. If the computer is on guest Wi-Fi and the phone is on the office router, the page will not open.
- Check the address: it must be the phone's IP, not the router's.
- The simplest test: plug the computer by cable into the PC socket of the phone itself and open the same address.
admin does not work? Then it has been changed — by a previous owner or by the carrier that configured the phone. The old password cannot be recovered; the only option is to reset the phone to factory settings.
Step 3. Enter the PBX credentials#
Which web interface you have#
The X3S web interface comes in two looks, depending on the year of manufacture and the firmware. The fields are the same; only their names and placement differ. Look at the screen after logging in:
- New look — a red menu on the left (System, Network, Line, Phone settings…); the line page has Register Settings and SIP Server 1 blocks. This is what the X3SG, X3S Pro and phones with recent firmware show.
- Old look — menu sections at the top in capitals (SYSTEM, NETWORK, LINES, PHONE…); the line page is one long Basic Settings table.
What goes where#
Open Line → SIP (old look — LINES → SIP). In the Line list at the top pick the first line — SIP 1 (in the new look it is shown as e.g. …@SIP1). Copy the values from the “Extension credentials” window:
| In the admin panel (“Extension credentials”) | New look (Line → SIP) | Old look (LINES → SIP) |
|---|---|---|
| SIP server | Server Address in the SIP Server 1 block | SIP Proxy Server Address |
Port 5060 |
Server Port (already 5060) |
SIP Proxy Server Port (already 5060) |
Transport UDP |
Transport Protocol in the SIP Server 1 block | Transport Protocol — in the Advanced Settings part of the same page |
User name (sip-…-<number>) |
Username | Username |
| The same user name again | Authentication User | Authentication Name |
| Password | Authentication Password | Authentication Password |
| Extension number (or a name: “Bar”, “Front desk”) | Display name | Display Name |
| — | Activate — tick it | Activate — tick it |
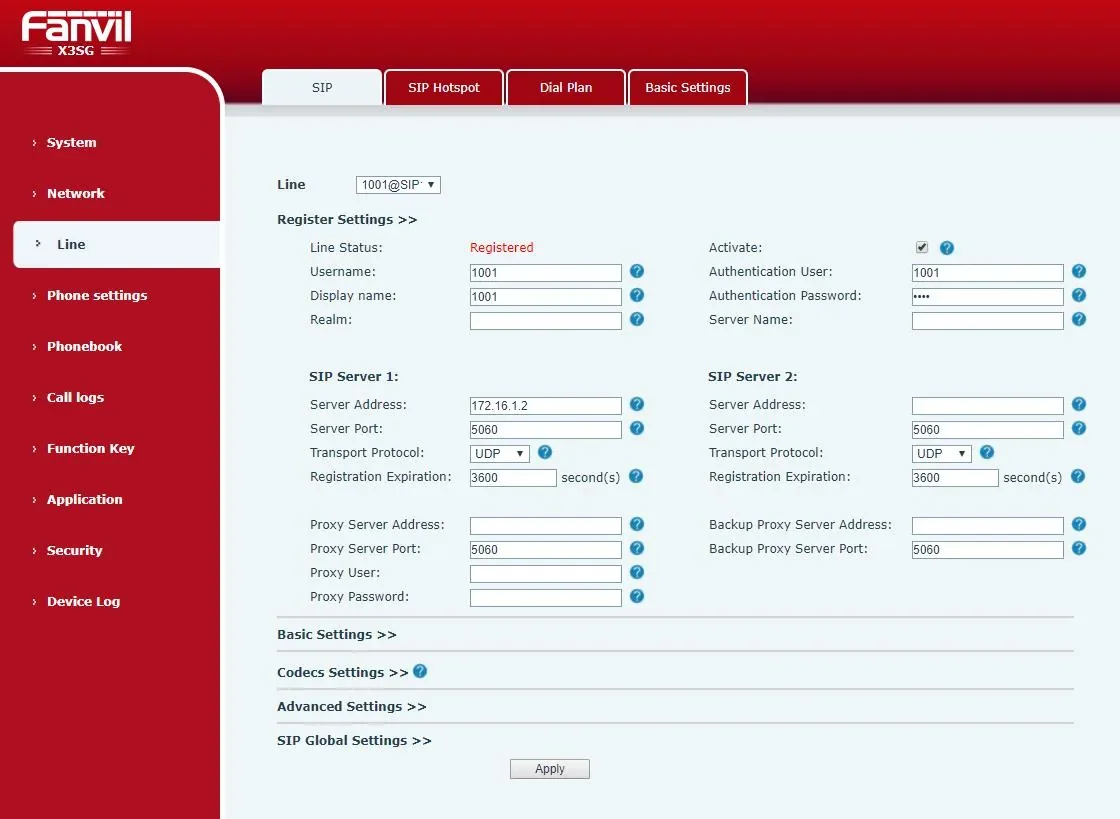 Screenshot: Fanvil X3SG User Manual V1.0 (firmware 1.1.20), p. 31 — “Web SIP registration”. The X3S with new firmware and the X3S Pro show the same page.
Three rules people break most often:
- The user name goes in whole, and twice — into Username and into Authentication User (Authentication Name). It is long, like
sip-1a2b3c4d-101. The short extension number101does not work in these fields: the phone will not register with it. - Copy, do not retype. Select the value in your saved text, Ctrl+C, click the field, Ctrl+V. In a password it is easy to confuse
land1,Oand0. Make sure you do not grab a space at the start or end. - The Activate tick is required. Without it the line is off, even if every field is right.
Leave these fields empty: Realm, Server Name, Proxy Server Address / Outbound Proxy Address, the whole SIP Server 2 block and Backup Proxy. Our PBX does not need them, and an extra value can get in the way of registration. Leave Registration Expiration at its factory value.
Click Apply at the bottom of the page. No reboot needed: within a few seconds the phone registers by itself.
Setting it up with the phone's own buttons (no computer at hand)
Everything above can be entered on the phone's keypad; typing the long user name and password just takes longer.
- Menu → Settings → Advanced Settings, PIN
123. - Accounts → SIP1 → Basic Settings (on the X3SG and X3S Pro: Menu → System → Accounts → Line 1, same PIN).
- Fill in Server Address, Server Port, Username, Auth. User, Auth. Password in turn and switch Registration to
Enabled. Press Save after each field.
The 2aB key switches between digits, lower-case and upper-case letters. The hyphen - in the user name is on the star * key (in letter mode press it several times until the character appears).
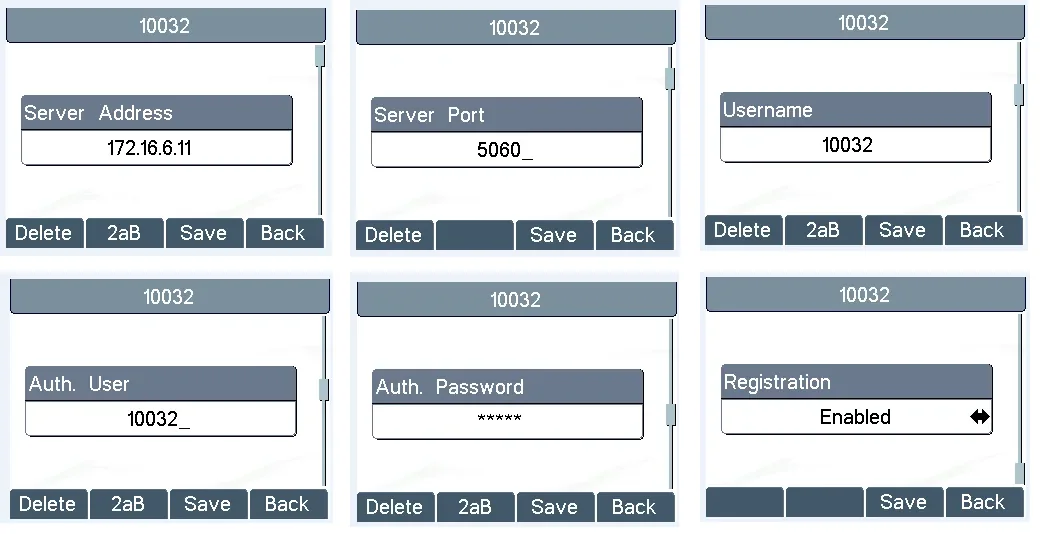 Screenshot: Fanvil X3S User Manual, pp. 20–24 — “Line Configurations”.
Advanced: codecs, DTMF, NAT, time
Everything below is on the same Line → SIP page, in the collapsed Codecs Settings and Advanced Settings blocks. You do not need any of it for the first start: the X3S factory values suit our PBX. Come here only if something is already not working right.
- Codecs (Codecs Settings). Our PBX speaks G.711A (PCMA), G.711U (PCMU) and G.722. They should be in the enabled list, preferably in this order; leave the rest alone. If a call connects but there is no sound, the codecs are almost never the cause — see the sound check in Step 4.
- DTMF Type (Advanced Settings) — RFC2833. This is the factory value. It decides whether a voice menu “hears” your key presses (“press 1…”) and whether call transfer by code works. Change it only if a previous owner set
SIP INFOorInband. - Use STUN — off. Our PBX does not need STUN.
- Keep Alive Type —
SIP OPTIONordummy UDP, interval about 30 seconds. Turn it on if the phone registers and then drops off after a few minutes: this stops the router from “forgetting” the connection. - Enable Rport — fine to turn on; helps behind a fussy router.
- Time — Phone settings → Time/Date (old look — PHONE → Time/Date): choose the venue's time zone, leave the SNTP server at its factory value. Without it the phone's call history shows the wrong time.
- Phone menu language — on the phone: Menu → Settings → Basic Settings → Language. Russian is available.
You do not need to forward any ports on the router. The phone reaches the PBX by itself (UDP 5060 for registration, UDP 10000–20000 for voice). A rule forwarding port 5060 from the internet to the phone only exposes it to scanners and to attempts to make calls at your expense. Details — “Venue network”.
Step 4. Check the registration#
“Registered” means the phone has found our PBX and the PBX has accepted the user name and password. Check it in three places:
- In the web interface. On the Line → SIP page the Line Status line should show Registered. It does not refresh by itself — press F5 to reload the page. Other values:
Trying— the phone is trying but has no answer yet;Timeout— the server did not answer;Unapplied— the line is not enabled or the settings were not applied (check the Activate tick and click Apply). A summary for both lines is also on the System → Information page. - On the phone. The line key lights steady green, and the line label (what you entered in Display Name) appears on the screen.
- In the admin panel. Under Telephony → Staff & groups the operator gets a green dot, and next to it the string the phone identifies itself with (for example
Fanvil X3S …). The status comes from the PBX and refreshes no more than once a minute.
Test call: lift the handset and dial a colleague's extension number, or ask a colleague to call yours.
Sound check — the *43 echo test. The green dot only speaks about registration. The voice travels as a separate stream and breaks separately: the dot stays green even when there is no sound at all. So always run the echo test after setup:
- Lift the handset, dial
*43and press Dial (or OK). The phone will not start dialling on a star by itself. - The PBX answers and plays a short beep after a second.
- Speak into the handset for about ten seconds: the PBX plays your own voice back to you.
How to read the result:
| What you hear | What it means |
|---|---|
| The beep, then your own voice | Sound flows both ways. Done |
| The beep but not your voice | Sound does not get from the phone to the PBX. SIP ALG on the router is the usual culprit — turn it off |
| Not even the beep, silence | Sound does not get from the PBX to the phone. The router or a firewall blocks UDP 10000–20000 |
| Choppy, “robotic” voice | The network is losing packets. Connect the phone by cable, not through repeaters or Wi-Fi bridges |
The echo test costs nothing, calls nobody and disturbs nobody. The measured numbers (loss, jitter, latency) land in the call log; the full breakdown is in “Checking call quality”.
Factory reset#
When you need it:
- the phone was bought second-hand or came from a previous carrier;
admindoes not open the web interface, or PIN123does not open the menu;- the phone “by itself” brings back old settings after a reboot (that is the previous carrier's auto-provisioning at work);
- you got lost in the settings and want a clean start.
⚠️ A reset wipes everything: the account, network settings, language, phonebook and call history. The firmware stays. If the phone is currently working with another carrier and you are not sure, write down its current settings first.
On the phone itself (X3S, X3SP, X3G):
- In standby press Menu → Settings → Advanced Settings.
- Enter PIN
123. - Select Reset to Default. The phone asks “Factory Reset, Continues?” — press Yes (or OK).
- The phone restarts with factory settings.
On the phone itself (X3SG, X3S Pro): Menu → Advanced Settings, PIN 123 → Restore factory Settings → choose what to clear → OK. There is also a way without the menu, for when nobody remembers the PIN: in standby hold the OK key for 6 seconds.
From the web interface (all models): System → Configurations. On the X3SG and X3S Pro the Reset Phone button wipes everything at once; next to it Clear Configurations clears selected modules: SIP (accounts), AUTOPROVISION (someone else's auto-provisioning server address), MMI (web interface passwords) and others.
After a reset the factory values apply again: web interface admin / admin, PIN 123, network DHCP. Then set the phone up again: language and time zone, then steps 1–4.
If the phone does not register#
In order, from the most common cause to the rarest:
- The
Activatetick is missing on the Line → SIP page. All fields are right, but the line is off; Line Status usually showsUnapplied. - A short number instead of the full user name. Username and Authentication User (Authentication Name) need the whole
sip-…-<number>. With101the PBX refuses, and Line Status gets stuck atTrying. - The user name is only in one field. Authentication User is empty or holds something else — enter the same user name as in Username.
- The password is outdated or mistyped. If someone clicked “Reset password” in the admin panel, the old password no longer works. Do not guess: issue a new one and paste it in.
Timeoutin Line Status — the phone could not reach the server. Check Server Address (copy it from the window again: a venue with a dedicated machine has its own address, not the shared one), port5060and transport UDP. On a second-hand phone TCP or TLS from the previous carrier is often left there.- Network Disconnected flashes on the screen — the phone is not on the network at all: the cable is in PC instead of Network, or the switch port is dead.
- The Status screen shows
Negotiating…instead of an IP — the router did not hand out an address. See Step 1. - Registration comes and goes every few minutes — the router “forgets” the connection. Turn on Keep Alive Type (see “Advanced” in Step 3) and turn off SIP ALG on the router.
- Settings “come back by themselves” after a reboot — the previous carrier's auto-provisioning is at work. You need a reset.
The generic network causes (ports, SIP ALG, guest Wi-Fi) are listed in “If it does not register” on the overview page.
Still stuck — or the phone is registered but there is no audio, calls drop after 30 seconds, incoming calls do not arrive? Troubleshooting by symptom — “Phone not working”; on-screen messages and error codes — “Not registering: error codes”.
Registered, but something does not work#
Internal calls work, outside calls (landlines, mobiles) do not. This is no longer about the phone: it registered, so the user name and password are right. Outbound calls are turned on in the admin panel: Telephony → “Outbound” tab. They are off by default, so nobody can make calls at your expense. There you also pick the provider number or trunk the call goes out through, and set rules of the form “dialled number pattern → line”. The rules can strip or add digits, so staff dial the way they are used to and the provider still gets the number in its own format.
The call connects but you cannot hear the other side (or they cannot hear you). This is about the voice stream, not registration. Run the *43 echo test (Step 4) — its result shows straight away which direction the sound is lost in. Nine times out of ten turning off SIP ALG on the router fixes it.
A voice menu ignores your key presses (“press 1”). Check that DTMF Type = RFC2833 (Line → SIP → Advanced Settings). It is the factory value, but a previous owner may have changed it.
Models in the family#
The web interface, the factory admin / admin and the PIN 123 are the same on all models below. They differ in power, network port speed and the look of the web interface.
| Model | Power | Network ports | Setup specifics |
|---|---|---|---|
| X3S | Power adapter 5 V only (in the box), no PoE | 2 × 10/100 Mbit/s | The basic model, 2 SIP lines. Everything as described above |
| X3SP | PoE 802.3af or power adapter (sold separately) | 2 × 10/100 Mbit/s | Same as the X3S plus power over the network cable |
| X3G | PoE or power adapter | Gigabit | An older model of the same range; menus and steps as on the X3S |
| X3SG | PoE or power adapter | Gigabit | New web interface (screenshot in Step 3); account on the phone — Menu → System → Accounts; reset with the OK key (6 s) |
| X3S Pro / X3SP Pro | X3S Pro — power adapter; X3SP Pro — PoE or power adapter | see the model datasheet | New web interface, like the X3SG; the same menu paths |
How to see the firmware version: the Status screen (↓ key), the Software line — or System → Information in the web interface.
FAQ#
Which password do I enter: admin, 123 or the one from the admin panel?#
It depends on where you are asked. The browser login window — admin / admin. The phone asks for a password on its own screen (for “Advanced Settings” or to unlock) — 123. The Authentication Password field on the Line → SIP page — the password from the “Extension credentials” window in the admin panel. See the table “Three X3S passwords”.
Where do I get the SIP password if the admin panel window is already closed?#
The old password cannot be viewed: we keep only its “fingerprint”, not the password itself. In Telephony → Staff & groups click “Reset password” next to the operator. A new password appears and the old one stops working immediately. If this extension is also set up on another device (for example in the app), enter the new password there too.
The phone says “Enter Password”, there is a padlock on the screen and the keys do not work#
The keypad is locked: someone held down the # key. Enter PIN 123 to unlock it (if nobody changed it). Automatic locking on a timer is configured in the web interface, in the Keyboard Lock Settings block (old look — PHONE → Advanced); it is off by default, and the phone only locks on a long press of #.
Do I need to turn on STUN or fill in Outbound Proxy or Realm?#
No. For our PBX these fields stay empty and STUN stays off. Some other providers require them; with us they only get in the way of registration.
Can I put a second extension on the X3S?#
Yes, the phone has two lines. Pick the second line (SIP 2) in the Line list and fill it in with another extension's credentials the same way as in Step 3. Outgoing calls go out on the default line shown in the top-left corner of the screen; switch it with the ← → arrows.
Can I set the phone up without a computer?#
Yes, with the phone's buttons: see the collapsed block “Setting it up with the phone's own buttons” in Step 3. Typing the long user name is tedious, but it works.
Sources#
- Fanvil X3S User Manual (the cover says X3G), document version 2.0, software 2.0, 2016-12-10 — https://download.fanvil.com/User%20Manual/En/X3S/X3S_User_Manual.pdf — sockets (p. 13), IP via the ↓ key (p. 17), admin/admin login (p. 18), network and PIN 123 (pp. 19–20), account from the phone (pp. 20–24), reset (pp. 53, 82), the LINES / SIP field table (pp. 57–62), troubleshooting (p. 84)
- Fanvil X3S / X3SP / X3G Quick Installation Guide V1.1 (Russian) — https://www.fanvil.com/upload/files/20210927/1812npzdz2.pdf — Russian menu item names, socket purposes, “down = Status”
- Fanvil X3SG User Manual V1.0 (firmware 1.1.20, 2019-08-29) — https://www.fanvil.com/upload/files/20210927/1812d2np20.pdf — the new Line → SIP web interface (p. 31), reset with the OK key and System → Configurations (pp. 94–95)
- Fanvil X3S(P) Pro / X3SG Pro User Manual V1.0 — https://www.fanvil.com/upload/files/20260106/1058pn086r.pdf — power, menu paths of the newer models
- Fanvil Document Center — all manuals and datasheets for the X3 models: https://www.fanvil.com/service/doc/file/index.html